Friday, 21 November 2014

Sentry Gun Post Mortem

On review of the sentry gun project as a whole I found it very fun and interesting! I decided to do something I don’t usually do, which made the project way more interesting and the ice cream concept made it super fun!
Speaking of the concept, I’m really glad I chose to do a fun and different idea, as I usually would have done something very generic and I feel like this idea is much more original.
If I could improve anything on this project I would like to go back and re-paint all my textures as I feel like they’re not quite right or good enough. I’m pleased with how they look on the model in the Unreal Engine but I definitely feel like I could improve them if I spent more time on them.


If I were to go back to this project I would spend way more time in ZBrush sculpting the umbrella and learning the process of baking more in depth. I find baking as a process very confusing and I had a hard time grasping how everything worked however I think with experience I would eventually understand it a lot more, so I think I’ll do it more in the future for practice. I found my sculpt wasn’t very good in the first place and the normals that I made from baking didn’t show through much on the final model in engine which was disappointing, so I would re-do all of that if I were to go back and work on the project some more.


I would also like to add some particle effects that were more fitting for the ice cream cart, like some blob of ice cream that shoot out when the ice cream is shot too. However I found out that after Christmas we will be revisiting this project and learning how to make particle effects so I’ll most likely do this at that point. 

We also had to make posters to advertise our sentry guns to tie the whole project together. I based mine on a Walls advertising poster I saw online which had a really smart advertising campaign and just added my sentry gun into the poster. 


As I progress through my second year I try my best on every project to try and push the boundaries and try make something as original as I can. This has definitely come from my tutors and peers showing awesome work that inspires me but not only that, it’s the drive I have in me to really push to get a great degree and an awesome job. 

Sunday, 16 November 2014

Ice Cream Is Deadly


This week/Monday marks the end of the Sentry Gun project and the start of the next one, however I'll mention that later. 

In my last blog post I talked about modelling and the dreaded baking, thankfully the topic this week is texturing, engine and any additional work I did throughout the week, which is much less stressful than baking.

The cart, barrel and pivot were all on the same 1024 texture sheet. So I started off by painting the albedo for these assets, a fairly simple texture was all I did however when I'd finished I realised the wood texture I had painted was really rubbish and didn't look as stylised as I'd originally wanted so I went back and re-painted it. I'm a lot happier with the outcome after re painting it.
A lot of the detail for the assets actually came from the normal and roughness maps. The cart's umbrella relied heavily on the normal map I made from the baked height map, as did the barrel and each part of the asset that had the wood texture on it.
The roughness maps were equally as important as it made the assets slightly glossy giving them a cute and smooth look which is what I wanted, although also giving the detail of scratches and other damage to make it slightly more realistic too.

Whilst in the process of texturing I continually checked each texture in engine, this helped me review the texture in the lighting I was going to use and make sure it looked exactly how I wanted. By doing this I was able to make the changes I needed to get the right final outcome. 


After making and adjusting the textures for each asset, I finally imported the models into the sentry gun scene that was made for us. It took me awhile to figure out how to swap out the pre-made model for my own but I got it in the end. I thought I had an issue with the barrel not firing the projectile but I found out that I had to make a socket named "Barrel_01" and put it in front of the barrel for it to shoot, I did so and it still wouldn't work. It turned out that I had accidentally put the socket too far into the barrel instead of outside the mesh. After fixing this it work just fine, I did however decide to change how fast the projectile was shot out so the player could actually see that the projectile is ice cream. 


As additional work I decided to add some audio. To do so I found an appropriate audio file which for my sentry gun would be an ice cream splat, I then downloaded the .wav file and imported it into the audio folder in UE4. 


After importing the file I created a Sound Cue and edited the blueprints to make it work correctly. 
The quality of the audio isn't very good so it doesn't sound much like a splat but I think it sounds good enough for someone to tell what it is.


For some more additional work I also made quick environment for my sentry gun to make the renders look more interesting. I did this also because my sentry gun looks slightly odd in the generic environment as it's an ice cream cart that shoots ice cream. I chose to make a path and some grass on a plane underneath the sentry gun to make it look like it belonged in the scene more. I did this additional work quite quickly so it's not amazing but it does the job.


Here are some extra beauty renders: 


Before I forget, the next project is Dichotomy Characters. For this we have to design two opposite characters. It sounds really interesting as we have a lot of freedom with what we can design and the budget we want to use! However I'm also not looking forward to it too much as I'm not really looking to be a character artist and I don't find making them very fun or interesting but we'll see, it may change my mind! 


Monday, 10 November 2014

Baking But Not The Good Kind

 The second week of the sentry gun project meant lots of modelling! So that's exactly what I did.

To start of I made a really quick block out of the sentry gun. I did this so I could do a super fast paintover so I could see how the design looked overall and to also show to others to explain my idea.


 For the paintover I made a colour block out which really shows the silhouette which is an important part of the design, looking at this it shows how strong the design is as if the silhouette is recognisable then it is a strong design.


First I had made the umbrella of the cart in Max, as it was very low poly it didn't look too great, so I ended up going through many iterations. A few attemps in Max proved that scuplting would most likely be the easiest way to make the folds and creases look realistic.


umbrella in Max

My first scuplt wasn't too good as a final outcome. As it was my first time using ZBrush I wasn't very aware of the all the different tools that could be used so after watching a few tutorials on the Pixologic website I had managed to understand the majority of tools I needed to use. 

first iteration

My second attempt was a lot better but not quite right still so I went back into ZBrush and played around some more. My third iteration was getting there...

second iteration

third iteration

Finally the fourth iteration was the best so far and I decided to use on the model. 

fourth iteration


What I had to do next was to bake the normals for the scuplt so the normal map can be put onto the low poly model to make it look like the umbrella I scuplted in ZBrush. It's ingenious however baking in Max was very confusing and to be honest I still haven't quite grasped it but some tutorials on YouTube are really useful like this one: https://www.youtube.com/watch?v=4LGMq4y--Eg

Moving on from the horror of baking, one of the tutors had given me the idea to use and alpha on part of the cart to show the ice cream in the tray below. I plan on testing this out and seeing if everything will work together. So far everything seems to be ok, just a matter of making sure all the materials are  assigned correctly really.

I have started texturing, the albedo is basically finished there's just a few details to add then I'll move onto the roughness, metalness and normal maps and all the maps for the projectile. 


Sunday, 2 November 2014

Sentry Guns and Ice Cream???

After a very brief post- mortem of the last project, I started the new project: the sentry gun!
Basically we have to design and make a sentry gun and it can be pretty much anything we want which is such a nice change not to mention awesome! Thankfully the animation of the sentry guns' movement was done for us. It looked confusing and I don't think I'm ready for that.

To start this project I first made a load of moodboards of pretty much anything and everything that inspired me. Some of these have sci-fi sentry guns, machinery, nature and ice cream? That last one might sound weird but trust me it makes sense.


Following moodboards I took Mike Kelly's advice from one of our lessons to make a quick bash kit of silhouettes that are interesting. 


Using the bash kit I then made some quick silhouettes of general sentry guns, however I didn't like any of these so I found a new direction and went with it. I had decided to look into making something that's kinda fun and maybe a bit weird so I made some silhouettes for that too. 


Looking at the silhouettes I had made, I narrowed it down to an idea that I liked which was the ice cream cart. I then took the silhouettes I liked and iterated each one


After iterating I then narrowed the choice down and iterated both silhouettes further and picked this one: 


My next step in this process was to do some concepts so firstly I did a greyscale paintover to show each part of the cart. I also made a perspective view concept testing out a colour palette.


This colour palette I actually picked from some images of ice cream as I not only wanted it to be very colourful but it also ties in really well with the ice cream theme. I've made some more colour palettes, I like all of them so I'm not sure which one I want to use yet.


Next I'm going to draw up some orthographics. And then obviously moving onto 3d modelling. 

Monday, 27 October 2014

Time For A Post Mortem

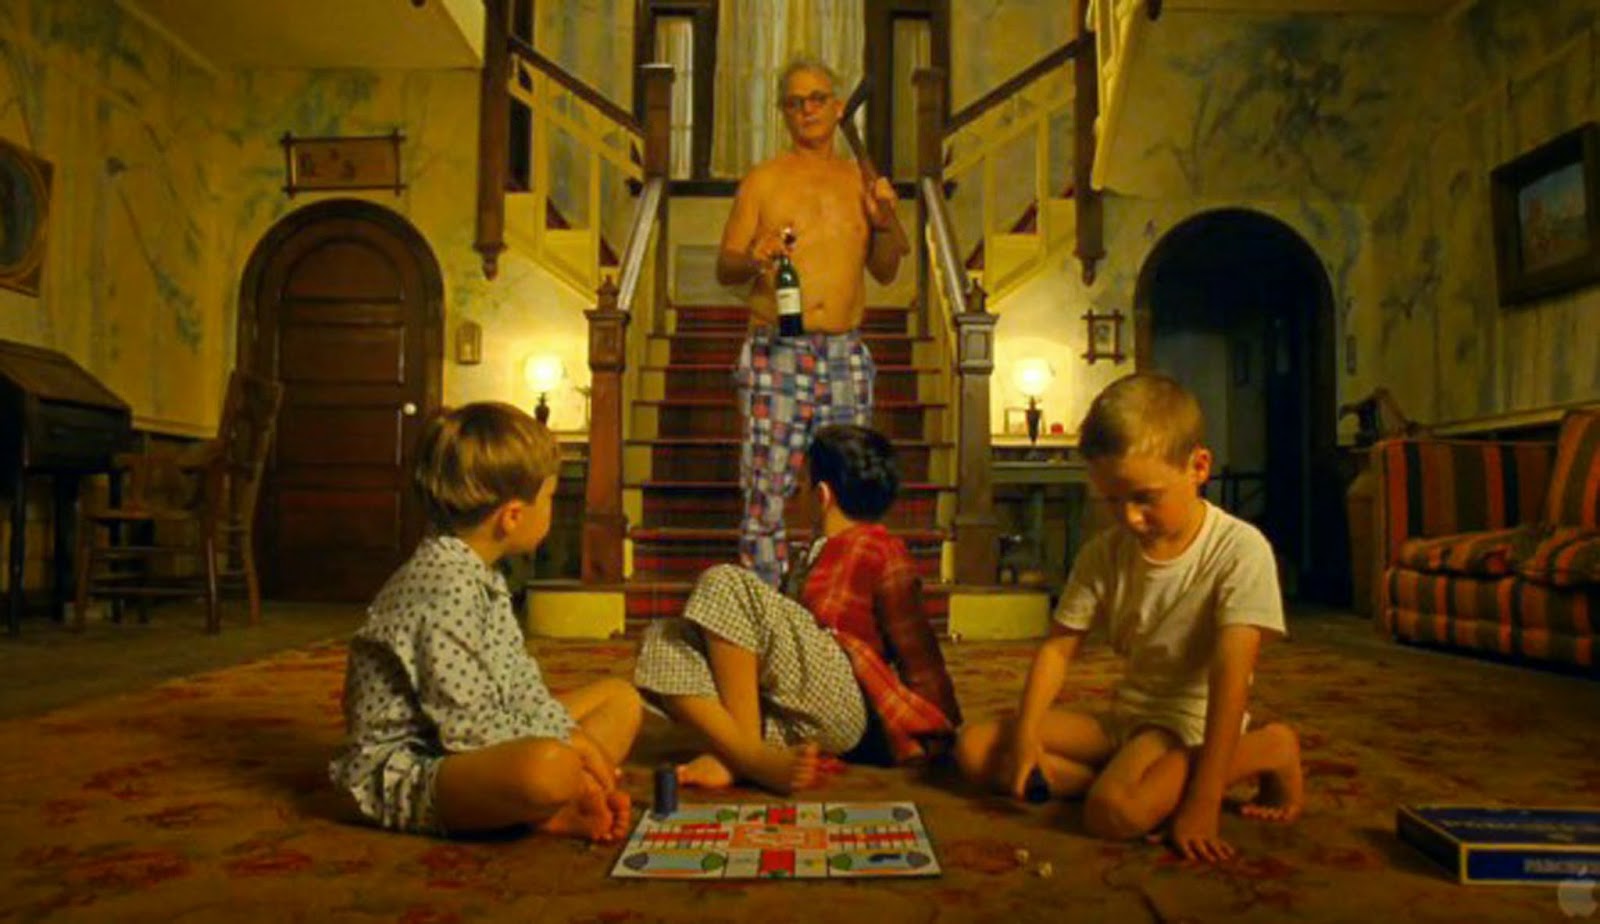
This week marked the end of the Film Room project. I really liked this project although it was sometimes a nightmare.
I've learnt a lot over the last three weeks which is why I really enjoyed this group work as I've learnt loads of new techniques and shortcuts for things within 3ds max and UE4.


So the Film Room project. In a quick analysis I would say that it went pretty well! Personally I'm really proud of our final scene, it's also pretty damn close to the original. 


Looking at the images side by side I can see there are still a lot of issues however on the time scale we had I think we managed to get similar results. One of the main issues I'd say is the lighting as we had lots of problems trying to get it exactly the same, this meant we went through many iterations before the final lighting you can see. In my opinion I think the lighting is really hard to replicate because when filming they probably had off screen lights which is hard to reproduce and due to post production filters, the lighting is still different from what we managed to make. 

So although there are issues with the final outcome I still think we did a good job and we definitely made a good team. 

Here are the assets I produced:


I had some issues with the alphas on the ceiling light not actually being translucent at all. 


As you can see in the image above the alphas are not working as they are completely opaque. I had tried plugging in the opacity multiple times and it just was not working. Thankfully Mark told us that he had seen a YouTube video showing how to create a glass material in UE4.


This was the what we had to do to get the alphas to work properly. We had to plug in a Lerp, several Multipliers and a Fresnel. As you can see below it definitely worked.


I think if we had time to go back to this project in the future we would sort out the lighting and dedicate a lot more time to it. Also our stretch goals would be to add interactive elements to the scene and have some animation.
Finally to finish off this blog post here are some final scene renders! 


Sunday, 19 October 2014

Model Making and Some Pegs

For the Film Room Project we had to make a physical model for of the room that we had chosen. So a week or so ago we had a lesson with Jack who showed us his architectural work which had some physical models included. After seeing these it gave us an idea of what we had to do in the couple of weeks that followed.

To start off the model, first we had to buy some materials. We went into town and to the art shop to get some ‘kappa board’ which is the material Jack had suggested we used, we also got some card.

First off we had to scale the 3d scene to the size we wanted to make it as a physical model, personally I found this confusing but that might just be because I’m not very good at maths. However we got all the scaled measurements done in one lesson and had started to cut out the shapes of the main exterior walls.

Next we decided to meet up at Luke’s and work on the model for a bit more as we had only just started it and we wanted it done pretty quickly so we could focus on our 3d work.
When we met up we had all the walls cut out and finished already, so we made a start on fixing the walls to the base we’d set up. We did this using pins so we could dismantle it really easily and reassemble it quickly.


For the rest of the time we had together for that night we managed to make most of the assets to go into the room. Some of them had to be redone as they weren't the correct scale and fit into the scene properly. So after meeting up we had done most of the model and just had some little things to finish the week after.


On Friday’s lesson this week we had to finish of the model. During this lesson we realised some of the assets needed re making and we had actually missed a few things like the ceiling light, the banisters for the stairs and the window at the back of the scene. So we all had something we needed to be doing, I had to re make the French horn case as it had gone missing at some point and we couldn't find it, I also helped make some of the banisters. Whilst Mark got to added the larger bottom step to the stairs and adding some detail to the window. Georgia had made the ceiling light ingeniously using some tin foil for the circular lamps.


So this Friday we got the model finished! And in my opinion it looks pretty decent. The only thing left to do now is to give it some proper lighting like it is in the real scene, which we’ll hopefully be able to do next week. 


And as a treat for reading through this here's a nice little picture of Luke and Mark being super productive!